The Archive
Retropie v2.3: The Guide
- Details
- Category: Tech
- Created on Wednesday, 15 October 2014 01:32
- Written by KTP
Retropie V2.3: The Installation Guide
Not too long ago, a tiny Linux based computer known as the Raspberry Pi was released into the world and the majority of people geeked the fuck out. People started coming up with crazy ideas and frothing at the mouth with this small and cheap device. Most of this revolved around media centers and things that involved Arduino boards. Let me try to clear any of the mystery and bullshit surrounding this device. This is a small but not very powerful device that is great for low overhead services running or for those that want to try to pick up Linux. Honestly, for about 30-40 bucks, this is a cool gadget if you are interested in tech. Since running emulators to play old school games would be considered “low overhead” in today’s tech world, the Pi becomes a pretty good fit for this.
In this guide, we will show you the steps to build your own “Retropie”. At the core, it is a Raspberry Pi running a program to organize, emulate, and showcase your old school game ROMs. Don’t expect to run anything past the 16-bit era to be done easily, but it can be done with some additional installs and tweaks. For this guide, I will be keeping those with limited IT knowledge in mind. The latest image for Retropie is at 2.3 at the writing of this guide so keep that in mind when downloading the latest version. Also know that I will make it as easy as possible to get the Retropie running as fast as possible with knowledge that was earned in blood and tears. This shit was a fucking pain in the ass to get configured, but I will leave configuration files so you can drop them in to avoid the headaches I incurred from wanting to chuck the fucking thing through the window. We are going to touch on a little Linux command line and using SSH with Filezilla. If that is starting to scare you off, don’t be a bitch. We got this shit.
 He also loves command line. Why don't you love command line?
Things you are Going to Need
Raspberry Pi- There are 3 versions of the Pi that you can pick up; the Model A, B, and B+. Get the B+. The B+ is more efficient with power, has more USB ports, and more RAM to use. They sell starter kits online that include most of the things you will need like a case, a SD Card, and maybe a shitty sticker. If you are stuck using anything but the B+ model, make sure you get a powered USB hub for extra ports. It’s not completely necessary, but you don’t really want to plug and unplug USB devices like an asshole everytime you need to change something.
SD Card- They usually come with the Pi or a starter kit, but we are going to need one that can not only hold the operating system and programs, but also handle the space of a shit ton of ROMs. I picked up a 16GB card, but you should be ok with an 8GB.
USB Keyboard and Mouse- You need these to configure the Pi. We will only need them to do the starting setup and maybe later if you want to make configuration changes.
Computer- This thing needs internet access at your home network. It will need a few programs that we will describe later as well as an SD Card reader. If it doesn’t have a reader, you can usually buy a USB SD Card reader for about 10 bucks.
TV with HDMI- This is what you are going to need to configure and use the Retropie on. If you don’t have one, they do sell adapters so all is not lost.
Xbox 360 Wired Controller- You are going to need the wired version to limit any sort of input lag (delays when you hit buttons on the controller to the game itself) that you may encounter. You can technically use wireless or other controllers, but the configuration files that I am giving you are configured with the 360 wired controller in mind to be as painless as possible. If you want to use other controllers, configuring them will be the biggest time consuming pain in your fucking ass. There are guides for the PS3 and other Logitech controllers, but use at your own peril. You have been warned.
The RetroPie Image- This is the image file we are going to load onto the SD card. This guide is written for version 2.3 so you can grab a copy at the RetroPie website or pick up the image from us here. Our version is zipped so make sure that you unzip it before use.
Win 32 Disk Imager- This is the program used for imaging the SD Card with the RetroPie image. For those on a Mac, you can use PiCloner which works similar. You can pick it up here.
Filezilla- This is going to be the program dump ROMs and configuration files over your home network and into the Pi once it’s loaded. You are going to SSH into that motherfucker like a pro once we are wrapping this installation up. You can pick it up here.
Configuration Files- Download these two files so that we can just drag and drop later. These are the controller configuration files that will save us a shit ton of time later. If you think you are a fucking tough guy/girl, I will show you how to edit these for your own configurations later on.
Download links below-
ROMs- You are going to need those ROMs to load into the Retropie later on because what good is an emulator without games. I can't tell you where to get them since it's legally a gray area (*cough* pirates *cough* at a bay) but I'm sure your google skills will lead to the right direction. They need to be unzipped and in a certain format to work, so if you swear you uploaded them and can't find them in Emulationstation, that might be the problem.
Getting the Image Ready
The first step we are going to do is grab the Retropie image from the site. Go ahead and download it from the site if you haven’t already and put in your blank SD card in the computer. We are now going to image the SD Card with it. Pop in your SD Card and load up Win 32 Disk Imager (PiCloner if on Mac).
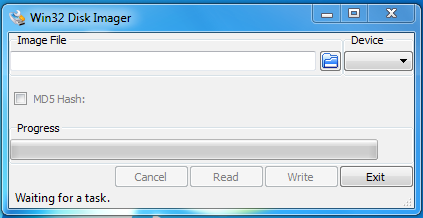 Example of the Win 32 Disk Imager. It is easy as shit to use.
Click on the folder icon in the top right of the open program and point to where you saved the Retropie image file. After that, change the Device on the right drop down option and select where you have your blank SD card. You can find out where in Windows by selecting the Computer option from the start menu and seeing what drive letter it’s associated with. Once that is sorted out, hit Write. This will take some time and should give you a notification once it’s done. Go get a drink while it finishes up. Once done, hopefully without errors, you will have a full working Retropie operating system. Think we are done? Fuck no.
Initial Raspberry Pi Configurations
Throw the SD card into the Pi, plug it into your TV, and turn it on by putting the power in last. Make sure the power is the last thing to plug in. If you plug video in last, you may get stuck with a horrible resolution that lasts until the next reboot. If you want to reboot, there’s no power button on this thing. You just turn on/off and reboot by unplugging the power cable. Once it powers on, it should show the Retropie splashscreen, load some scary black screen text, and finally boot up Emulationstation which will be the home to actually playing games. Think you are done? Nooooope.
You should have a keyboard and mouse plugged in. You are going to do the scariest thing in your life and hit F4. Do it. That super safe place of warmth and comfort is going to disappear and you will enter the super scary world of command line. Don’t bitch out on me now. We got this shit.
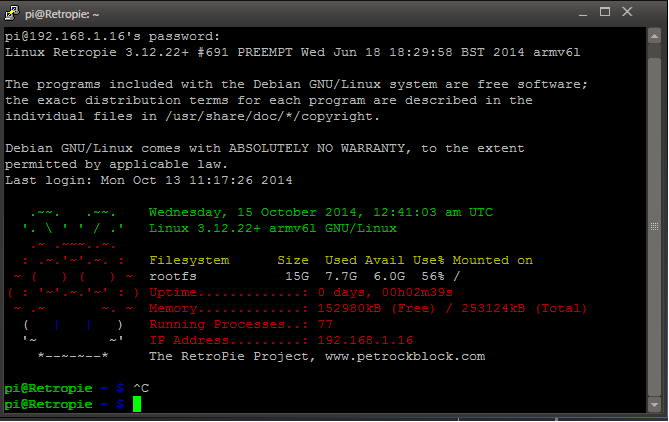 Spooky Command Line
From the command line depicted above we are going to enter some commands. You will need to have the Pi connected to the internet via ethernet cable on your router prior to startup. Enter them exactly as shown. The first is to update the list of whatever software packages are available to the Pi.
Enter the following- sudo apt-get update
It should be short and sweet. Next, we need to need to actually install whatever upgrades we get from the update.
Enter the following- sudo apt-get upgrade -y
The “-y” at the end is telling the command to automatically answer “yes” for an install and the “sudo” stands for “Super User DO” if you were curious and runs programs that would normally be restricted by the operating system. This may take a little bit, but once done, we should now have a fully updated Raspberry Pi.. Command line isn't so bad is it? Let's do some easier configurations that are a little more important to what we want to do. We need to tweak how the raspberry pi actually functions and this is going to be a bit easier to work with.
Enter the following- sudo raspi-config
This should take you into an actual menu screen where you can make selections. You are going to want to select Expand Filesystem so that your Raspberry Pi actually uses all the space on the SD card. Depending on which model you bought determines if you want to overclock it and you can select it from this menu. I personally set mine to Moderate, but you may want to play around with this option if you notice any performance drops. The last option we are going to set is in the Advanced Options. From here, select SSH and set it to Enable. We need this so we can transfer ROMs and the configuration files to the Retropie later on. I changed the hostname to Retropie, but you can leave it alone if you want.
 The Raspberry Pi Configuration Menu. Now in blue.
Retropie Configurations using the Setup Script
The guys that made the RetroPie made a handy script that we will run to tweak the Retropie itself. We need to change the directory and go to the folder that it is in. Syntax is fucking important in Linux so make sure you type correctly.
Enter the following- cd RetroPie-Setup
 Example of the Retropie Script. It is also easy as shit to use.
It should change to the command line to the folder you just told it to go to. Now we are going to run the actual Retropie script.
Enter the following- sudo ./retropie_setup.sh
Make sure that it is EXACTLY as above. Remember that “sudo” is “Super User DO”? Well, the “./” at the beginning of the retropie_setup.sh is how Linux executes programs on command line. Once you run it, you will be in a menu option that was similar to the raspi-config we ran earlier. The two you are going to select are UPDATE Retropie Setup Script and UPDATE Retropie Binaries. Go ahead and select both one after the other. It will take some time to run, but make sure they complete correctly. If they do, you should find yourself back in the menu.
After these are both done, go ahead and get another beer and then select SETUP which should be the third option. From here, take note that you can come back and mess with the splashscreen that you see in the beginning and install a PS3 controller. I won't cover that in this guide as we are going to use the 360 controller. Select Install Xbox contr. 360 driver from the menu. This shouldn't be nearly as long as the first two. You should have gone through one or two drinks through this section, as it takes some time. Once it's said and done, select Reboot.
Adding the Controller Configuration and ROMs
Now we are going to jump into networking with Filezilla so we can dump the ROMs into their respective folders and drop in the configuration files so we can get the controllers up hassle free. You are going to fuck with basic networking now. We got through command line so we can get through this. Don't be soft. You think Terry would be soft at a time like this?
It should have rebooted by now and the pretty Emulationstation is loaded. Say goodbye and hit F4 to get back to the command line. We are going to need the IP address from this thing to remote into it. If you don't see it in red next to the ASCII Pi logo we can find it with the command line.
Enter the following- ifconfig
This will pull the address that is currently assigned to the device. Look for where it says eth0 and next to the field “inet addr”. It should be a series of 4 numbers seperated by dots and should look something like 192.168.1.10 or similar. Write these numbers down. We are going to need this to connect to it with Filezilla. You downloaded it, right? No. Grab a copy and install it on your computer. We are getting to the last steps by using your computer to connect to the Retropie from your home network.
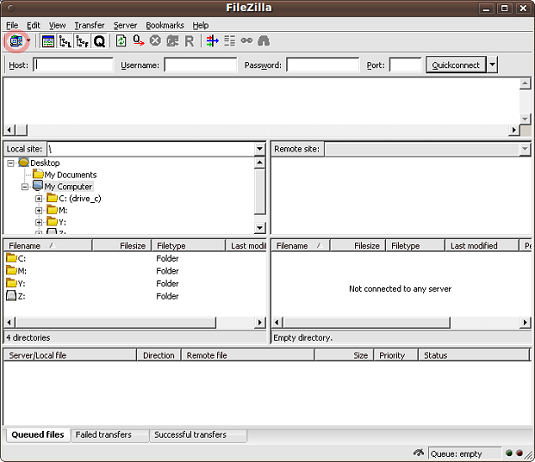 Raaawwwrrrrrrrrrr
Pictured above is Filezilla up and running. You may have to hit okay on a popup window from the program itself, but it should be looking similar. Look at the top bar where there are Host, Username, Password, Port.
Enter the following credentials-
Host- (This is the IP address or “inet addr” that you saw earlier. Enter it here.)
Username- pi
Password-raspberry
Port- 22
If you remember when we enabled SSH, that is a networking protocol known as Secure Shell and uses port number 22. It will take a few seconds but you should see some texts below where you just entered the information working its magic. If you have done it right, you will see a message that says “Directory Listing Successful”. There are two parts in the middle that are Local Site and Remote Site that will list their file directories below them. Local Site is your computer while Remote Site is the Retropie that you are connected to.
We are now going to “upload” the files from your computer to the Retropie. Download the files from the links provided above if you haven't done so yet. Navigate through the folder tree of the Local Site section until you see the files you just downloaded. Now navigate to the folder “/opt/retropie/configs/” in the Remote Site location. You do this by clicking on the folders until you reach there or by typing “/opt/retropie/configs/” in the Remote Site: field. You should see the same file retroarch.cfg. Our file is actually configured so we are going to overwrite what's on the Retropie with ours. Drag the file retroarch.cfg from where you have it on the Local Site section into the Remote Site folder named “all”. It will ask you to overwrite it. Select Yes. You are also going to drop copies into the “game gear”, “master system”. “megadrive”(Sega Genesis), “nes”, “pcengine” (TurboGraphix 16), and “snes” folders to play it safe. Select Yes to Overwrite for all of them. The next file is rc.local which we are going to place in the “/ect” folder. Select Yes to overwrite.
Now to dump the ROMs so that Emulationstation can actually see what you have and make it available for play. Make sure that the ROMs you have are not zipped and it the right format (example: NES ROMs should have the .nes file extension) or else it won't see them. You have no idea how long it was until my dumbass figured out that it wasn't reading my SNES ROMs because they were zipped. This time, we are going to navigate to “/home/pi/RetroPie/roms” and drop the ROMs into their respective folders.
Get yourself another drink because the hard part is over. After you have the ROMs uploaded, you should now have a functioning Retropie ready to play.
 That's the smell of victory motherfucker.
Closing Tips
I wrote this guide with version 2.3 in mind so there may be changes down the road. I will keep the files up as long as possible for those that still want to use this version. I also wrote this in mind with only SNES, NES, PC ENGINE, MASTER SYSTEM, GAME GEAR, and MEGADRIVE files in mind since they are ready out of the box. The Retropie is fully capable of handling MAME (arcade ROMs), NeoGeo ROMS, and has been reported to handle PSX and N64 ROMs. Those are a little more involved and could probably be their own articles.
If you want to edit controller configuration it is editable in the retroarch.cfg file aka the biggest pain in the ass I have run into a long time. The hard part is done though, so you can just edit what is in the file with a text editor like EditPad Lite. Just scroll down the file until you see the joystick configuration and swap the numbers listed. Save the file and upload it back to the Retropie.
A special thanks goes out to the writers of the guides at GitHub and PetRockBlog for making this happen.